How to Adjust Sprinkler Heads, Step By Step
A lush, beautiful lawn is easy to enjoy. When the grass is growing the way it should, the yard is a place you and your family want to be. Unfortunately, many people struggle to get the lawn of their dreams.
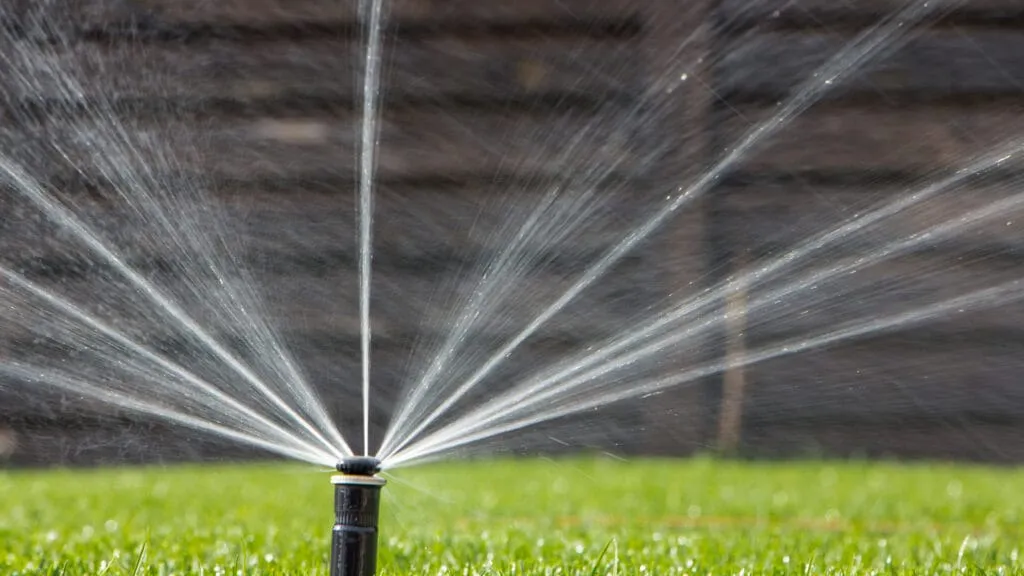
One factor that can help significantly with the process of growing a beautiful lawn is having a sprinkler system. But simply turning on the sprinklers is not enough to get you the lawn you want — you also need to know how to adjust sprinkler heads. Adjusting sprinkler heads is a simple task that can make a big difference in the health of your lawn.
Why you need to adjust sprinkler heads
You will need to adjust your sprinkler heads from time to time as you learn about the needs of your lawn. Sprinkler heads are installed in zones and are designed to provide complete coverage for your yard. However, full coverage is not automatic. Once the system is installed, you will need to start adjusting sprinkler heads to get the arc, spray pattern, and coverage that your yard needs. The watering needs of your yard will vary depending on a number of factors. An area of your lawn that gets six to eight hours of direct sunlight during the day will need more water than an area that has partial or full shade. The type of grass, soil, and drainage in your yard will also impact how much water each area needs. If you notice that a particular section of your yard is turning brown, then you need to start adjusting sprinkler heads to get more water to that area. On the other hand, if water is pooling in one section of your yard, it means you need to figure out how to adjust sprinkler heads, so less water goes to that area. Adjusting sprinkler heads is all about getting the appropriate level of water to the different areas of your lawn.Four steps for adjusting sprinkler heads
Learning how to adjust sprinkler heads is not complicated. A big part of adjusting sprinkler heads is figuring out what type of sprinklers you have and getting the right tools for the project. Once you have the tools you need, the process is all about paying attention to the needs of your lawn so you can make the appropriate adjustments.Step 1: Determine what type of sprinkler heads are in your yard
The first step of learning how to adjust sprinkler heads is to figure out what type of sprinkler heads are in your yard. The process of adjusting sprinkler heads is slightly different for each type. Common types of sprinkler heads include rotor, pop-up, and impact sprinklers.Step 2: Find the right tool to adjust the sprinkler heads
The second step for adjusting sprinkler heads is to find the right tool for your particular type of sprinkler head. Some sprinkler heads can be adjusted using a flathead screwdriver, while others require specialized adjustment and rotor tools. A simple turn of a screwdriver or specially designed tool is typically all it takes to adjust a sprinkler head.Step 3: Identify areas of your yard that need water level adjustments
Once you know what type of sprinklers you have and the tools you need to adjust them, it is time to identify the areas of your yard that need water level adjustments. Easy signs to look out for are areas with brown grass and spots where the water pools. The areas with brown grass need better sprinkler coverage and the areas where the water pools need less coverage.Step 4: Experiment with spray level and radius
It will take some experimentation to get the spray levels and water radius just right. Make adjustments while your sprinklers are running in order to get the levels, and arc adjusted properly.Products and tools you’ll need to adjust sprinkler heads
- Rotor screwdriver: The Rain Bird Rotor tool is a simple solution if you want to know how to adjust Rain Bird sprinkler heads. It can also be used to adjust other brands of rotor sprinklers. You simply insert the rotor screwdrivers into the arc adjustment slot and turn clockwise to increase the arc or counterclockwise to decrease the arc.
- Rotor nozzle tool: Some brands of sprinklers require a specially designed tool to adjust the head. If you do not have a standard screw on the top of your sprinkler head, then you may need a specific tool like the Hunter Rotor Nozzle tool in order to make adjustments.
- Slotted screwdriver: Some sprinkler heads can be adjusted using a thin slotted (flat head) screwdriver that most people have around the house. For example, Rain Bird sprinkler adjustment can often be done using a slotted screwdriver like the Klein Tools Flat Head Screwdriver.
- Phillips head screwdriver: If you see a Phillips head screw on the top or side of your sprinkler heads, it means they can be adjusted using a Phillips head screwdriver like the one made by Craftsman.
- Sprinkler adjustment multi-tool: You can also opt to purchase a sprinkler adjustment multi-tool to cover all of the potential sprinkler adjustment scenarios. The Orbit Sprinkler System adjustment tool is a 16-in-1 system that provides a variety of options for sprinkler head adjustment.